

Customizing the List View
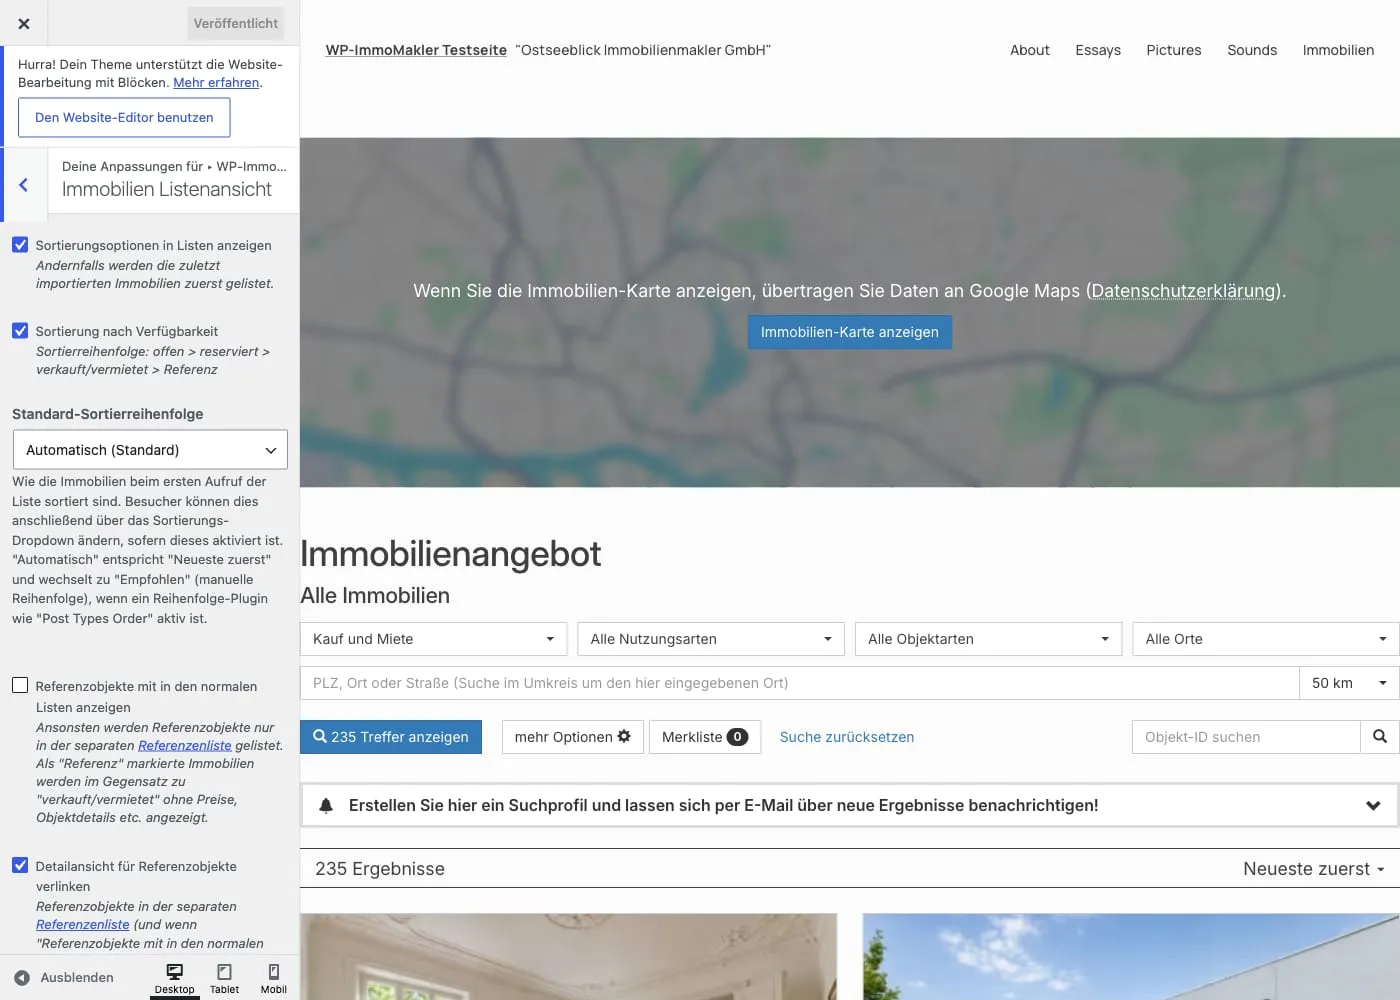
You control the appearance of the property list view centrally in the WordPress Customizer. There you see your changes immediately in the live preview before saving them.
Opening the Customizer
Section titled “Opening the Customizer”Open the Customizer in your website’s backend (wp-admin) under Appearance → Customizer. WP-ImmoMakler adds its own WP-ImmoMakler panel there, with the sub-section Immobilien Listenansicht (Property list view).
Layout and Width
Section titled “Layout and Width”These options determine the basic structure of the list — width, number of properties, and column arrangement.
| Option | Description |
|---|---|
| Maximum width of the list (px) | The maximum width of the list view (default: 1300 px). |
| Number of properties per page | How many properties are shown per page before pagination kicks in (default: 12). |
| Number of columns | Number of columns. Recommendation: “automatic (CSS grid)” — the actual number of columns then results from the minimum width (see next option). A fixed number of columns (1–4) is still available for existing installations or special cases. |
| Columns (automatic): minimum width in pixels | With “automatic”: how narrow the property boxes may become on smaller displays before the number of columns is automatically reduced (default: 360 px). This value indirectly controls your desired column count. The similar properties in the detail view always use this value, even with a fixed number of columns. |
| Columns (automatic): gap in pixels | Spacing between the property boxes (default: 25 px). Like the minimum width, this also applies to the similar properties. |
| Arrangement | “Images on top” (default) or “Images on the left” — position of the preview image within a box. |
Preview Images
Section titled “Preview Images”Control the size, format, and effects of the preview images in the list.
| Option | Description |
|---|---|
| Pixel dimensions of the preview images | Image size of the preview images. If the images look blurry, choose a larger pixel format. |
| Aspect ratio of the images | Uniform aspect ratio (original, 16:9, 3:2, 4:3, or 1:1; default: 3:2). |
| Image alignment | Image section at a fixed aspect ratio: top edge, center (default), or bottom edge. If, for example, you show your logo at the bottom edge of the image, choose “bottom edge” so it always stays visible. |
| Magnification effect | Preview images are slightly enlarged and brightened on mouse-over. |
| Preload effect | Preview images are first shown as a blurred preliminary version until the actual image has loaded. |
| Display images as a slider PLUS | Shows all property images as a slider already in the list view. |
Box Layout
Section titled “Box Layout”Properties are displayed in uniform boxes. Use the Box layout toggle (on/off) to enable or disable the box display entirely; the following options refine its appearance.
| Option | Description |
|---|---|
| Box style | “Long” (detailed, default) or “Compact” (condensed display). |
| Set off the main price graphically | Visually highlights the most important price in the “Compact” box style. |
| Show border | Shows or hides the frame around the boxes. |
| Border color | Color of the box frame (default: #cccccc). |
| Background color | Background color of the boxes (default: #ffffff). |
| Light shadow around the boxes | Gives the boxes a more three-dimensional appearance. |
| Shadow brightness | Brightness of the box shadow (185–254). |
| Corner radius in pixels | Radius for rounded corners. Choose 0 for sharp corners. |
Displayed Property Data
Section titled “Displayed Property Data”Define which data fields and prices appear on the list boxes.
| Option | Description |
|---|---|
| Show property data | Select which property attributes (e.g. living area, rooms, location) appear in the list. |
| Show prices | Select which price details (e.g. purchase price, net rent) are shown. |
Sorting
Section titled “Sorting”| Option | Description |
|---|---|
| Show sorting options in lists | Shows the sorting dropdown for visitors. Otherwise the most recently imported properties are listed first. |
| Sort by availability | Sort order: available > reserved > sold/rented > reference. |
| Default sort order | How properties are sorted the first time the list is opened (date, price, rooms, or area, each ascending or descending). Default: “Automatic” — newest first, or the manual order if an order plugin is active. Visitors can then change the order via the sorting dropdown. |
Reference Properties
Section titled “Reference Properties”| Option | Description |
|---|---|
| Show reference properties in the regular lists | Otherwise reference properties only appear in the separate reference list. Properties marked as “reference” are shown — unlike “sold/rented” — without prices and property details. |
| Link to the detail view for reference properties | Links reference properties to their respective detail view (without property data). |
Coloring the Status Bars
Section titled “Coloring the Status Bars”You configure the status bars (“new”, “top property”, “sold”, etc.) on the preview images in the Customizer under WP-ImmoMakler → Colors. There you set the base color under Default color of the status bars (list view) and can define separate colors for “sold/rented”, “reserved”, and “new” via Use extra colors for each status.
WP-ImmoMakler Notice
Section titled “WP-ImmoMakler Notice”Use the Show WP-ImmoMakler notice option to display a discreet note at the end of the list view indicating that the view was created with WP-ImmoMakler.
Adding Texts and Content Blocks
Section titled “Adding Texts and Content Blocks”Using the WP-ImmoMakler Child-Skin-Plugin or a page builder such as Elementor or Divi, you can add your own texts, info boxes, or notices above or below the property list. In Elementor and Divi, simply place the desired elements at the appropriate position in the visual editor.
Styling with CSS
Section titled “Styling with CSS”Visual adjustments that go beyond the Customizer options — such as font color, font family, or text transformation — are best done via CSS. Add your code to the immomakler.css file in the WP-ImmoMakler Child-Skin-Plugin:
.immomakler h1 { text-transform: uppercase !important;}Start with an empty immomakler.css and only add the styles you actually want to override. Do not copy the entire default CSS file from the plugin. Once a file is placed in the WP-ImmoMakler Child-Skin-Plugin, it is loaded from the Child-Skin-Plugin instead of from the main plugin.
Changing the Search Results Button Text
Section titled “Changing the Search Results Button Text”The default text of the button that displays the number of results (e.g., “Show 12 results”) can be customized via a filter in the WP-ImmoMakler Child-Skin-Plugin. Please add the filter to the functions.php of your WP-ImmoMakler Child-Skin-Plugin:
add_filter( 'immomakler_search_button_text', function() { return '%s Treffer anzeigen';} );The %s placeholder is automatically replaced with the number of matching properties.
Customizing the Heading
Section titled “Customizing the Heading”Customize the main heading above the property list view either via a filter (for targeted changes to individual headings) or via a template copy of title.php. Place all customizations in your WP-ImmoMakler Child-Skin-Plugin so that they are preserved during plugin updates.
Via Filter
Section titled “Via Filter”Use the immomakler_archive_headline filter to replace the main heading with a title of your choice. Place the filter in the functions.php of your WP-ImmoMakler Child-Skin-Plugin. In the simplest case, return a new title unconditionally:
add_filter( 'immomakler_archive_headline', function( $title ) { return 'Immobilienangebote';} );Note: With this approach, you would overwrite all headings of the property archives at once (see the checklist under Via Template Copy). To replace only a specific heading, check the original value first:
add_filter( 'immomakler_archive_headline', function( $title ) { if ( $title === 'Immobilienangebot' ) { return 'Immobilienangebote in Lübeck'; } return $title;} );Via Template Copy (title.php)
Section titled “Via Template Copy (title.php)”Alternatively, place a copy of title.php in the archive directory of your WP-ImmoMakler Child-Skin-Plugin. Replace the default output
<?php echo esc_html( immomakler_archive_headline() ); ?>with your own heading:
<h1 class="archive-title">My Custom Title</h1>To remove the heading entirely, simply place an empty title.php in the archive directory of your WP-ImmoMakler Child-Skin-Plugin.
The sub-heading can be customized via the immomakler_archive_subheadline hook.
Via Page Builder
Section titled “Via Page Builder”If you design the list view with a page builder, customize the heading directly in the visual editor. For details, see the relevant articles: Elementor Pro, Divi Theme Builder, Bricks, WPBakery, Oxygen, Gutenberg Blocks, and other theme builders.
Subheading / Adjusting the Sub-heading
Section titled “Subheading / Adjusting the Sub-heading”Below the main heading, a supplementary sub-heading appears, which varies depending on the filter and category. On the general property overview, it defaults to “All Properties”. Use this filter to replace exactly this default text with your own wording — without affecting the individual sub-headings of specific categories. Enter your desired wording in place of “Your new text”.
add_filter( 'immomakler_archive_subheadline', function( $title ) { if ( $title === 'Alle Immobilien' ) { return 'Dein neuer Text'; } return $title;} );Adding Property Data to the List View
Section titled “Adding Property Data to the List View”Use this filter to add further data fields to be displayed on each property box in the list view — in addition to the default fields selected in the Customizer (see the “Displayed Property Data” section above). In the example, room count, living area, and plot area are added; adjust the $add_keys array to your needs.
add_filter( 'immomakler_property_data_archive_keys', function( $property_data_keys ) { $add_keys = [ 'anzahl_zimmer', 'wohnflaeche', 'grundstuecksflaeche', ]; return array_merge( $property_data_keys, $add_keys );} );Making All Customizations Update-Safe
Section titled “Making All Customizations Update-Safe”The Customizer settings are automatically preserved during updates. Make any further changes to templates, CSS, or via filters exclusively in the WP-ImmoMakler Child-Skin-Plugin. This is the only way to ensure that those changes are also preserved after plugin updates.