

Create Single Template
With Elementor Pro you can design the detail view of every property individually. WP-ImmoMakler provides specialized widgets for this purpose that cover all aspects of a property — from the image gallery and data sheets to the contact form.
Requirements
Section titled “Requirements”- Elementor Pro version 3.20.0 or later
- WP-ImmoMakler (any edition)
Option A: 1-Click HTML version (quick start)
Section titled “Option A: 1-Click HTML version (quick start)”The 1-click widgets display WP-ImmoMakler’s proven HTML templates — including the gallery, data, map, contact form, and everything else that belongs to a complete detail view.
-
Open the Theme Builder
Navigate to Elementor → Theme Builder and create a new template of type Single Post via Add New Template.
-
Choose an empty template
Close the template library to start with a blank template.
-
Set the preview property
To have the editor show real data instead of placeholders, set the preview property — see Set the preview property below.
-
Insert the widget
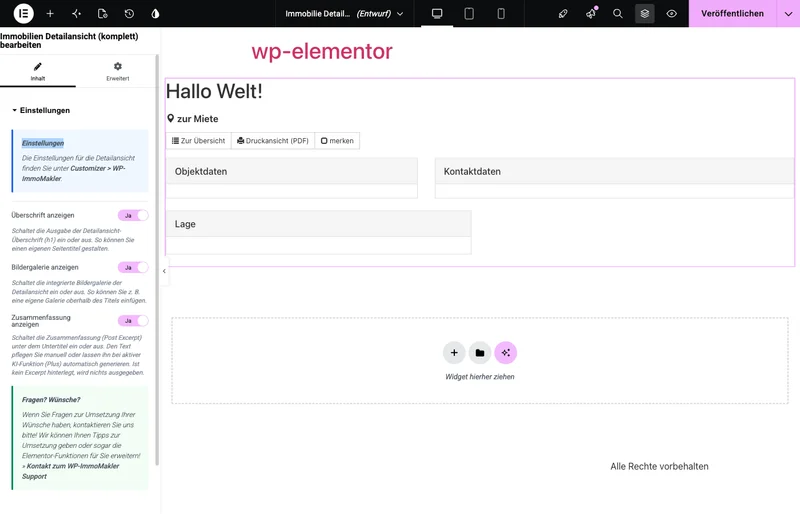
In the widget sidebar, search for the WP-ImmoMakler: 1-Click HTML Version category and drag the Detailed view of real estate (complete) widget onto the page.
-
Set the condition
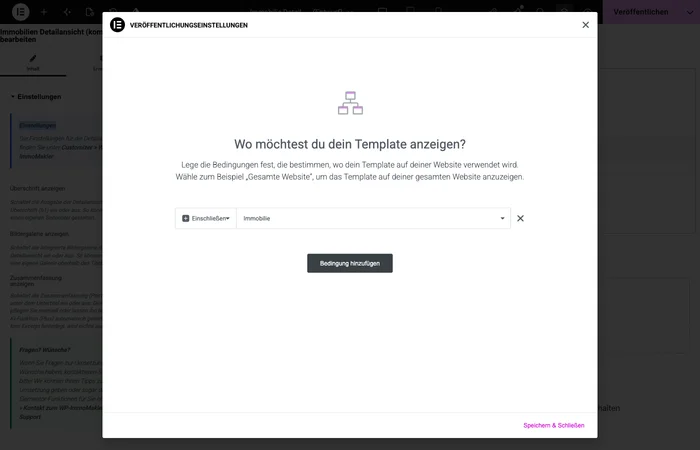
Click Publish, then Add Condition, and in the selection menu under the WP-ImmoMakler group choose the condition Property. This applies the template to all property detail pages.
-
Done
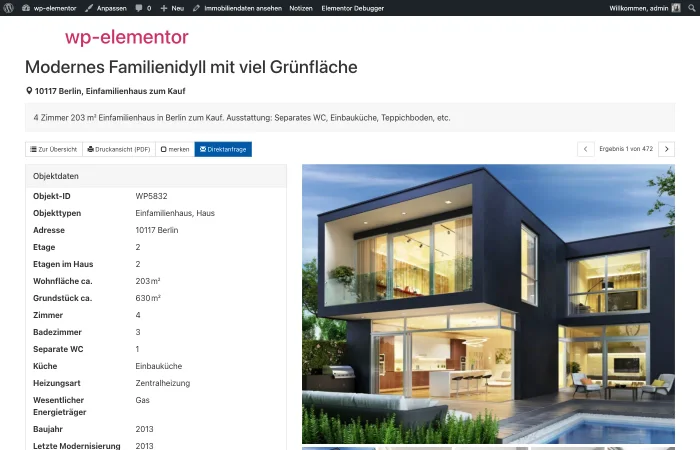
The detail view is now displayed using the WP-ImmoMakler HTML template.
Option B: Custom template
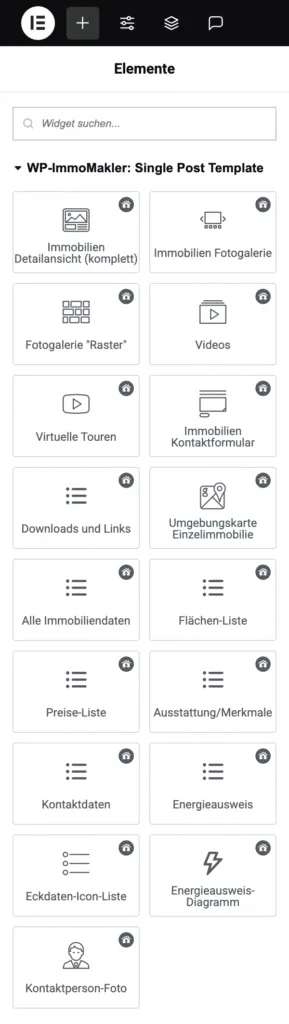
Section titled “Option B: Custom template”For full design freedom, build the detail view from individual WP-ImmoMakler widgets. Each widget represents a specific aspect of the property and can be freely positioned and styled.
-
Open the Theme Builder
Create a template of type Single Post as described above.
-
Set the preview property
To have the editor show real data instead of placeholders, set the preview property — see Set the preview property below.
-
Set up the page layout
Choose a blank template. Create the desired page structure with containers — for example, a main area with gallery and data on the left, contact form and contact person on the right.
-
Add the gallery
Drag one of the gallery widgets onto the page:
Widget Description Real estate photo gallery Full image gallery with Slideshow and Static mode, lightbox and all Customizer options configurable per widget instance Gallery Grid No longer in the widget panel: the layout has moved into the Real estate photo gallery widget as the Static layout Mosaic. Instances already placed continue to be displayed The Real estate photo gallery widget provides the same options you know from the Customizer — on a per-widget-instance basis. See Configure the gallery below.
-
Add property data
Add the desired data widgets:
Widget Displays All real estate data Freely configurable data table with all property fields Area list All area information (living area, plot area, etc.) Price list All price information (purchase price, base rent, additional costs, etc.) Equipment/features Property features as an icon list Energy certificate Energy certificate data as a data table Key data icon list Any data fields as an icon list Key data boxes Key figures as visual tiles -
Insert description texts
Use an Elementor Text widget with the Real estate: Description texts Dynamic Tag to display the property description from the real estate software. In the Dynamic Tag you can select the desired text field (property description, location, features, additional information, etc.).
-
Add the map
Drag the Area map of individual property widget onto the page. It displays the property’s location with the map provider you selected in the Customizer under WP-ImmoMakler → Maps.
-
Design the contact area
Widget Description Real estate contact form Inquiry form with automatic property assignment Contact details Name, phone, email of the contact person Contact person photo Photo of the contact person -
Downloads and links
Add the Downloads and links widget to display PDF exposés, floor plans, and external links (e.g., virtual tours).
-
Videos and virtual tours
Widget Description Videos Embedded YouTube/Vimeo videos Virtual tours PLUS 360-degree tours Energy certificate diagram PLUS Graphical energy certificate scale -
Set the condition
Click Publish, then Add Condition, and choose the appropriate condition from the WP-ImmoMakler group:
Condition Description Property Template applies to all properties Reference property Template applies only to reference properties
Configure the gallery
Section titled “Configure the gallery”The Real estate photo gallery widget offers the same options per widget instance as the Gallery section in the Customizer. Here is an overview of the most important groups:
| Area | Options |
|---|---|
| Image selection | All images, floor plans only, without floor plans |
| Gallery type | Slideshow (Swiper-based gallery with lightbox) or Static (image grid without slider, lightbox on click) |
| Slideshow layout | Vertical (thumbnail strip below), Horizontal (thumbnail strip right), No thumbnails, Carousel |
| Static layout | Vertical (thumbnail strip below), Horizontal (thumbnail grid right), No thumbnails, Grid (all images as equally sized tiles, no main image), Mosaic (blocks of 4 photos with alternating large and small tiles, no main image) |
| Transition effect | Slide (default), Fade or “Aus- und Einblenden” — see Image Gallery: Slideshow |
| Transition duration | 100–2000 ms (default 400 ms) |
| Autoplay | Automatic cycling with configurable delay in seconds |
| Aspect ratios | Main and thumbnail images independently configurable (16:9, 3:2, 4:3, 1:1, Golden Ratio, Original; static additionally 2:1 and 3:1) |
| Thumbnail size | 40–400 px width (controls the number of thumbnails visible at once) |
| Mobile thumbnails | Show or hide on devices ≤ 768 px |
| Carousel height | Pixel or viewport unit (px, vw, vh, svh, lvh, dvh) |
| Static grid | Rows and columns independently configurable per layout variant |
| Gallery height (static) | Automatic or fixed |
| More photos indicator | Counter overlay on the last thumbnail (+N) or button below the gallery (“Show all N photos”) |
| Hover animation (static) | None / Gentle zoom-in (default) / Brighten — visual feedback when hovering over images with the mouse |
| Grid options | Only in the “Grid” static layout: columns (maximum, 1–6), minimum tile width (below which a column drops automatically), tile aspect ratio, image fit (Crop for photos or Show in full for floor plans) and image title as caption. Combined with the “floor plans only” image selection, this produces a floor plans box like the WP-ImmoMakler skin’s |
| Mosaic options | Only in the “Mosaic” static layout: block aspect ratio, row height distribution (1:1, 2:1 or golden ratio) and limit number of images (4, 8, 12 or 16 images) |
| Spacing + rounding | Gap between images, border radius (each image individually or only the gallery outer edges) |
| Navigation colour | Colour picker for arrow buttons and pagination dots (Slideshow mode) |
Full details on each option are in the Customizer docs for Slideshow and Static gallery — the same terminology applies to the Elementor widget.
Dynamic Tags for the detail view
Section titled “Dynamic Tags for the detail view”In addition to the specialized widgets, you can use Dynamic Tags in any Elementor widget — for example, in headings, text blocks, images, or buttons. All WP-ImmoMakler tags appear in the tag selection dialog under the WP-ImmoMakler group.
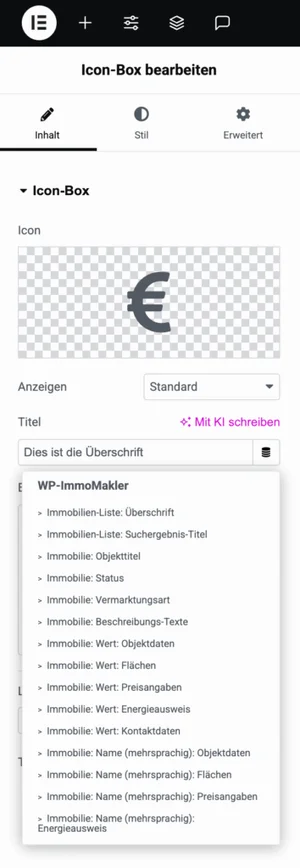
Text tags
Section titled “Text tags”| Tag | Description |
|---|---|
| Property: Title | Property title from the real estate software |
| Property: Status | Current status (active, sold, rented, etc.) |
| Property: Marketing type | Sale or rental |
| Property: Description texts | Free-text fields (property description, location, features, etc.) |
| Property: Value: Property data | Value of any data field (e.g., year of construction, floor) |
| Property: Name (multilingual): Property data | Label of a data field |
| Property: Value: Areas / Property: Name (multilingual): Areas | Area values and labels |
| Property: Value: Prices / Property: Name (multilingual): Prices | Price values and labels |
| Property: Value: Energy certificate / Property: Name (multilingual): Energy certificate | Energy certificate data and labels |
| Property: Value: Contact data | Contact person fields (name, phone, email, etc.) |
Image tags
Section titled “Image tags”| Tag | Description |
|---|---|
| Property: Featured image | Main image of the property (for Image widget or background image) |
| Contact person photo | Photo of the contact person |
| Single property photo | Single image by its position in the gallery |
| Property photos | All photos (for Gallery widget or Carousel) |
| Floor plans | Floor plans only |
URL tags
Section titled “URL tags”| Tag | Description |
|---|---|
| Property: Link to detail view | Permalink of the property |
| Property: Link to PDF print view | URL of the automatically generated PDF |
| Property: First PDF attachment | URL of a manually uploaded PDF attachment |
| Property: First PDF attachment with “floor plan” in the title or file name | URL of the first PDF attachment whose title or file name contains “floor plan” |
| Property: Link to extra gallery page | URL of the standalone gallery view |
| Property: Link back to list view (to the property’s card) | For a “Back to the overview” button: leads back to the list the visitor came from - filtered search, page 3, homepage carousel - and scrolls there to the property’s card |
Using Display Conditions
Section titled “Using Display Conditions”Display Conditions are especially useful in the detail view to show sections only when the corresponding data is available — avoiding empty areas on the page. You find the conditions in the Advanced tab of a widget or container, in the WP-ImmoMakler group, and combine them with an operator (Is not empty / Is empty).
Example: A property without videos should not show an empty video section — condition Video + Is not empty.
| Condition | Recommended use |
|---|---|
| Images present | Show/hide the Gallery widget |
| Videos present | Show/hide the Videos widget |
| Links / Downloads present | Show/hide the Downloads section |
| PDF present | Show/hide the PDF download button |
| Energy data present | Show/hide the Energy Certificate section |
| Contact person present | Show/hide the Contact Person section |
| Description fields present | Show/hide individual text sections |
| Property data present | Show/hide specific data rows or tiles |
| Virtual tours present PLUS | Show/hide the Tours widget |
Taxonomy-based conditions
Section titled “Taxonomy-based conditions”Taxonomy conditions let you create different layouts for different property types:
- Marketing type: Different price display for sale vs. rental
- Property type: Different data fields for flats vs. plots
- Status: Special display for reference properties
- Usage type: Commercial properties presented differently from residential ones
- Country: Country-specific field assignments
Showing related properties
Section titled “Showing related properties”If you want to display additional properties below the detail view (e.g. via Elementor’s Loop Grid or Posts widget), you naturally don’t want the currently displayed property to show up there again. Elementor Pro has its own setting for this — you don’t need a query ID from WP-ImmoMakler.
-
Add a Loop or Posts widget
Add a Loop Grid or Posts widget below your detail view and configure it to display properties (post type Property).
-
Exclude the current property
In the widget, open the Query tab and select Current Post under Exclude By.
-
Optional: show only available properties
To exclude already sold or rented properties, add the term Property Status: open under Include By > Terms in the same tab.
-
Done
The currently displayed property no longer appears in the loop.
Showing only similar properties
Section titled “Showing only similar properties”PLUS If the loop should show not just any properties but only similar ones — same property type, same marketing type, and proximity in location — enter the value immomakler_similar_properties in the widget under Advanced > Query ID. WP-ImmoMakler then filters the results using the same rules as the automatic Similar Properties block, and excludes the property currently displayed. The query ID only takes effect on property detail pages; on other pages, the query remains unchanged.
Set the preview property
Section titled “Set the preview property”When editing the template, Elementor displays placeholder data by default. To have the editor show a real property, set the preview property in the page settings — ideally right at the start so you can work with real data as you build:
-
Click the gear icon (Page Settings) in the editor panel footer.
-
Open the Preview Settings section.
-
Under Preview dynamic content as, select Property and search for an existing property.
-
Click Apply & Preview. The template will now be displayed with the data of that property.