

Setup Wizard
After installation, the setup wizard guides you through the most important WP-ImmoMakler settings. It opens automatically right after you activate the plugin; you can also open it at any time in the backend of your website (wp-admin) under WP-ImmoMakler → Setup.
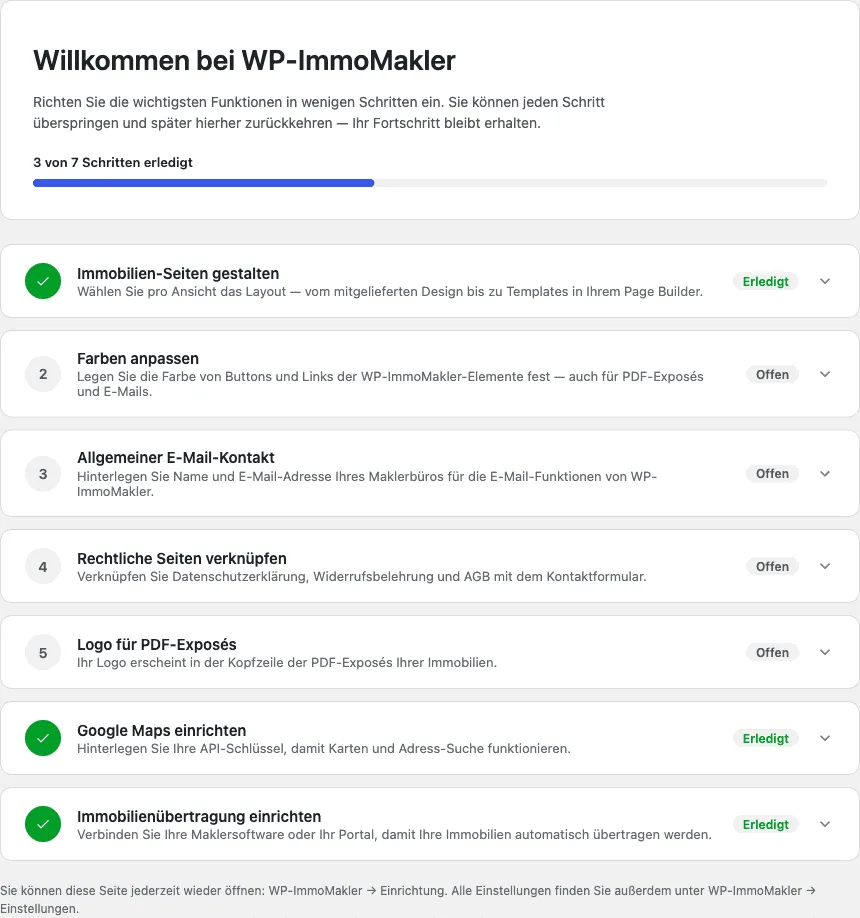
Which steps the checklist shows depends on your website: the logo for PDF exposés is available in the PLUS editions, and the Google Maps step appears only if your maps are drawn with Google Maps.
How the checklist works
Section titled “How the checklist works”The setup wizard is a checklist, not a one-time wizard:
- Every step can be skipped. Click “Do later” and come back at any time via WP-ImmoMakler → Setup.
- The status is determined live. Whether a step is shown as “Done” or “Open” is derived directly from your current configuration. Settings you make elsewhere — for example under WP-ImmoMakler → Settings — are automatically recognized as done here.
- Saving without a page change. Each step is filled in and saved directly in the checklist; the progress indicator updates immediately.
- The menu item shows your progress. Next to Setup in the WP-ImmoMakler menu you can see how many steps are done (for example “3/6”). Once all steps are done, the indicator disappears.
You will also find all settings of the wizard on the regular settings pages — the wizard is a shortcut, not a separate place where settings are stored.
Design the property pages
Section titled “Design the property pages”In this step you choose the layout of the property pages — separately for the property list (the archive) and the detail view. WP-ImmoMakler detects your page builder and shows the layouts it supports for each view:
| Layout | What you get | Available for |
|---|---|---|
| Starter template | A ready-designed view made of individual WP-ImmoMakler elements of your page builder. You move, change or remove every section in the editor. | Avada, Elementor Pro, WordPress Site Editor |
| Hybrid template | A template in your page builder that contains the finished WP-ImmoMakler view (HTML) as a single element: with Elementor Pro a widget, with Divi a module, in the Site Editor a block. You design the view around it freely. | All supported page builders |
| HTML template | The plugin renders the view itself, without any template in your page builder. You adjust it in the Customizer and, if needed, via HTML/CSS; new features are added automatically with updates. | Any website |
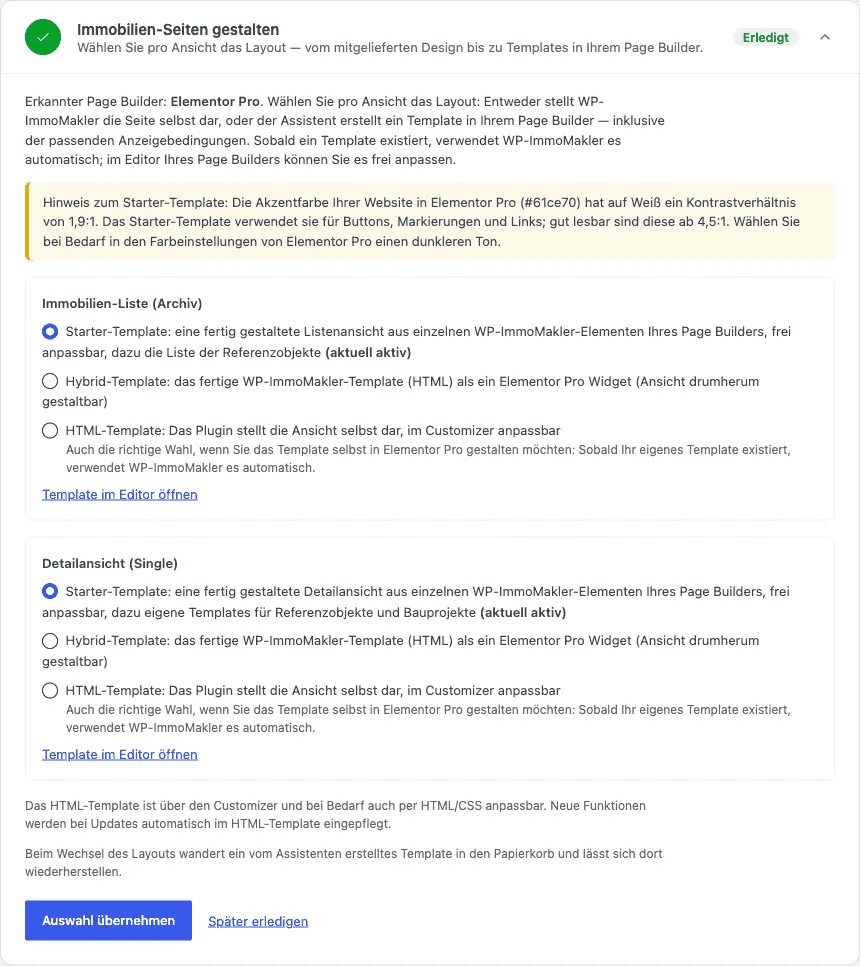
-
Choose a layout for each view
Under Property list (archive) and Detail view (single) choose one layout each. You can build the two views differently, for example the list as a starter template and the detail view as an HTML template.
-
Apply the selection
Click Apply selection. When the wizard creates a template, it also sets the matching display conditions. The template applies immediately to all property pages, including the lists of individual categories such as marketing type, property type or location.
-
Open the template in the editor
Open template in editor takes you straight to the editor of your page builder. With Elementor Pro and Bricks the preview is already preset: the detail view shows one of your properties, the archive the property list.
As soon as a template exists, WP-ImmoMakler uses it automatically; you do not need to change anything. The step counts as done as soon as a layout is chosen for both views.
Starter templates
Section titled “Starter templates”A starter template is built the same way in Avada, Elementor Pro and the Site Editor. It takes its colors and fonts from the global settings of your page builder or theme. In the structure view of the editor every section has a name, for example “Location” or “Contact form”.
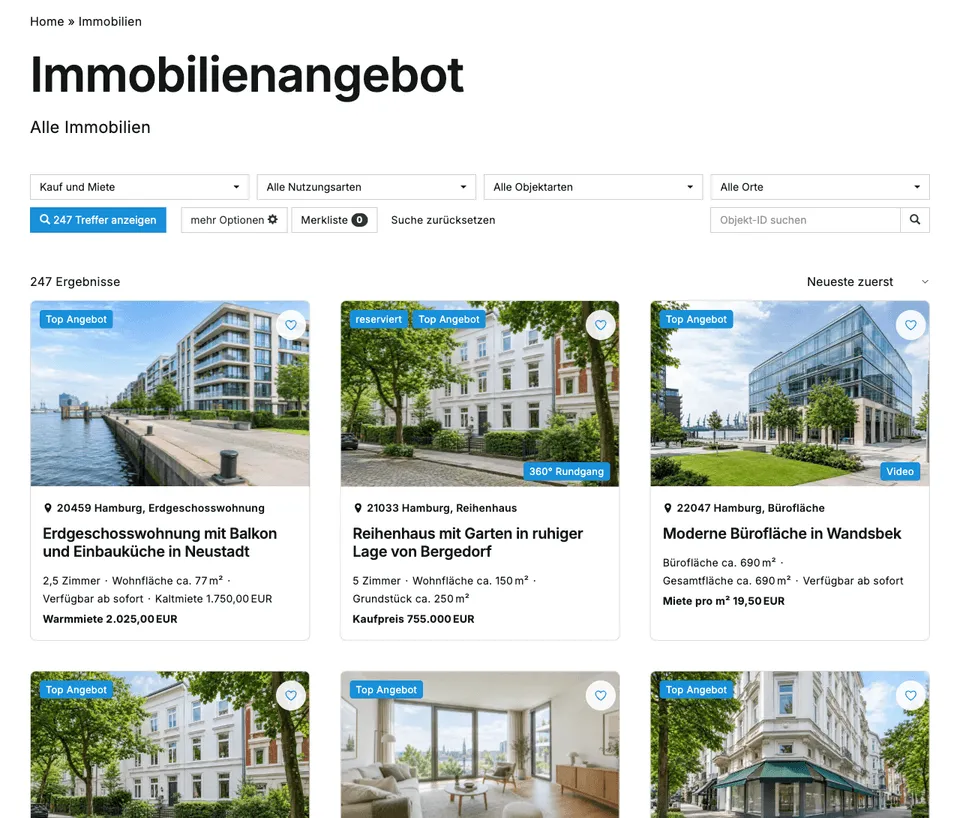
With the starter template for the property list, the wizard creates:
- the property list with a map of the list PLUS, breadcrumbs, heading, subheading, description of the location or category, search form PLUS, result count with sorting and the properties in a grid of three, two or one column depending on the screen width,
- the list of reference properties,
- the card of a property used by both lists and by “Similar properties”: image, tags, favorites button PLUS, location, title and key facts.
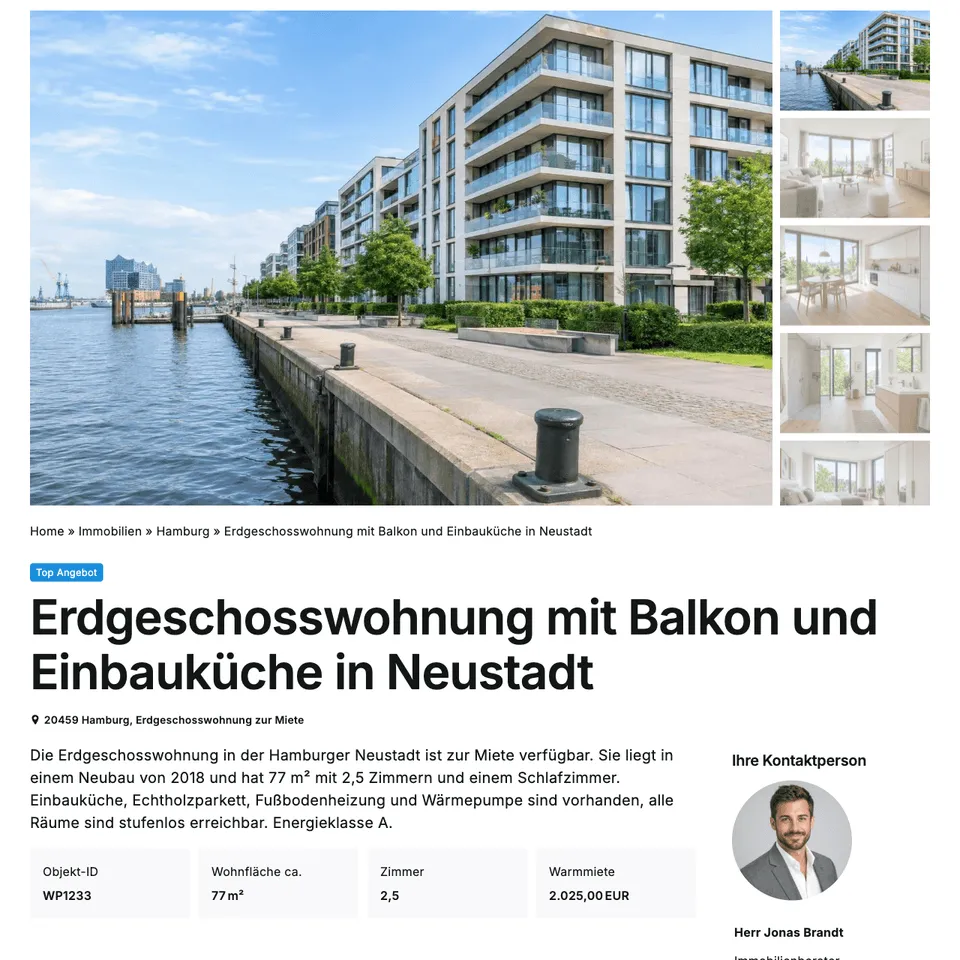
With the starter template for the detail view, the wizard creates three templates: for properties, for reference properties and for construction projects. The template of a property contains:
- image gallery, breadcrumbs, tags, heading, location, summary and key fact boxes,
- the sections property description, videos, 360° tour PLUS, property data, areas, prices, features, floor plans, location with map, energy certificate and other details,
- in the sidebar the contact person with photo and contact details, the buttons Send enquiry, PDF exposé PLUS and Save PLUS as well as downloads and links,
- the contact form and “Similar properties” PLUS,
- on the page of a unit of a construction project also the note about the project and its other units.
A section without content does not appear: a property without videos shows no “Videos” heading. If a property is reserved, sold or let, a note about it appears at the top of the page. The contact form, the contact person next to it and the Send enquiry button appear only while the property accepts enquiries.
Where you find the templates in your page builder:
| Page builder | Created by the wizard |
|---|---|
| Avada | Layout Sections “WP-ImmoMakler Immobilie”, ”… Referenzobjekt”, ”… Projekt”, ”… Immobilienliste” and ”… Referenzen”, the Post Card “WP-ImmoMakler Immobilien-Karte” and the Avada Layouts that assign them |
| Elementor Pro | In the Theme Builder the same five templates as “Single Post” and “Archive”, plus the Loop Item “WP-ImmoMakler Immobilien-Karte” |
| Site Editor | The templates “Archive: Immobilie”, “Single item: Immobilie”, “Single item: Referenzobjekt”, “Single item: Bauprojekt” and “Referenzen”, with the header and footer of your theme |
Note on the contrast of the accent color
Section titled “Note on the contrast of the accent color”The starter template uses the accent color of your website for buttons, tags and links. If this color has a contrast ratio below 4.5:1 against white, the step shows a note with the measured value. You can still create the starter template; it becomes easier to read with a darker shade in the color settings of your page builder.
If your website already has its own template
Section titled “If your website already has its own template”The wizard never changes templates that you created yourself. If your website already has its own template for a view, the step shows this and keeps using it.
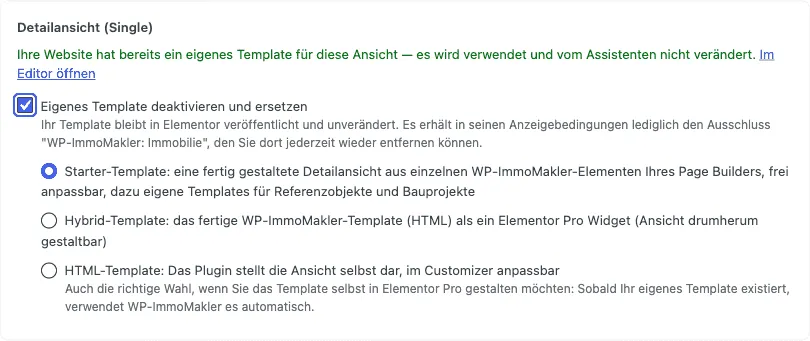
In Avada, Elementor Pro and the Site Editor you can replace it with a layout of the wizard. To do so, tick Deactivate and replace own template and choose the layout. Your template is not deleted in the process:
| Page builder | What happens to your template |
|---|---|
| Avada | The Layout Section stays in the Avada library and is only removed from the layout. You can assign it again there at any time. |
| Elementor Pro | The template stays published and unchanged. Its display conditions get the exclusion “WP-ImmoMakler: Property” or “WP-ImmoMakler: All property lists”, which you can remove there again. |
| Site Editor | The template is kept in the Site Editor as a template of its own, but is no longer used automatically for properties. |
Switching the layout
Section titled “Switching the layout”Your choice is not final. If you switch the layout, a template created by the wizard is moved to the trash, where it can be restored.
Supported page builders
Section titled “Supported page builders”The wizard creates templates for:
- Avada: starter template and hybrid template
- Elementor Pro (Theme Builder): starter template and hybrid template
- WordPress Site Editor (block themes): starter template and hybrid template
- Divi 4 and Divi 5 (Theme Builder): hybrid template
- Bricks: hybrid template
- Oxygen (version 4): hybrid template
- WPBakery Page Builder: hybrid template. With the Impreza theme it is created as an Impreza page template and assigned in the theme options; with other themes such as Salient, Bridge or BeTheme as a template page
- Enfold: hybrid template as a template page in the Advanced Layout Builder
If you use Elementor without Elementor Pro, a theme without its own template feature or a page builder without a template system such as Beaver Builder, WP-ImmoMakler takes care of displaying the property pages itself. The step then shows a notice and counts as done. The display corresponds to the HTML template.
Customize colors
Section titled “Customize colors”The colors in this step apply to everything WP-ImmoMakler renders itself: the property pages in the bundled design and in the hybrid template, as well as the contact form, search and PDF buttons and gallery controls in builder layouts — they also serve as the default for PDF exposés and emails. Without your own setting, these elements appear in the default blue of the bundled design; the remaining colors of your layouts are still determined by your theme or page builder.
A starter template, on the other hand, takes its colors from your page builder: buttons, tags and links follow its global colors. The colors of this step apply there only to the parts that WP-ImmoMakler renders itself, such as the contact form.
In this step you activate your own colors for links and buttons and set them with the color picker:
- Color of links and buttons — preset with the main color of your theme or page builder, if WP-ImmoMakler detects one: the global accent color of Elementor, the accent color of Divi, color 5 of the global Avada palette, the first color of the first color palette of Bricks, the primary color of Impreza’s color style, the accent color of Salient, or the link or accent color of a block theme.
- Text color on buttons — usually white, so that the text on colored buttons stays readable.
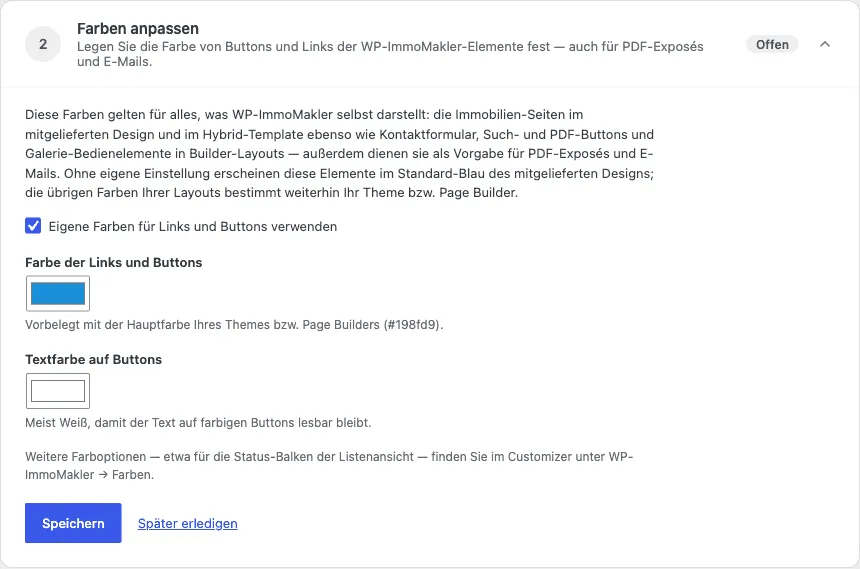
The step counts as done as soon as the custom colors are activated. You can find further color options, for example for the status bars of the list view, in the Customizer under WP-ImmoMakler → Colors.
General email contact
Section titled “General email contact”WP-ImmoMakler sends and receives emails in many places — from the contact form through the import notifications to the cancellation form. Without your own setting, WP-ImmoMakler uses the email address of the WordPress administrator for this — often that is the agency that looks after the website, not the estate agent’s office. In this step you therefore store the name and email address of your office as the general email contact.
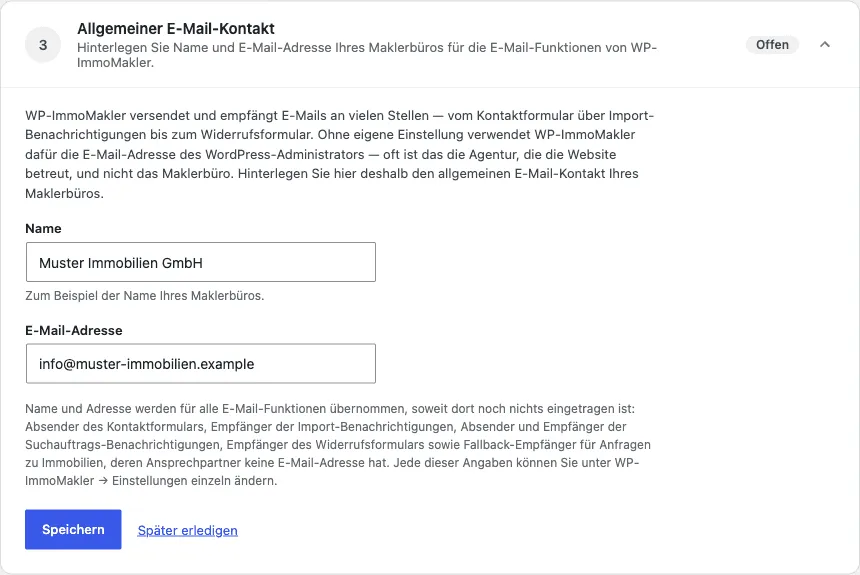
When you save, WP-ImmoMakler adopts the name and address for all email functions where nothing has been entered yet: as sender of the contact form, recipient of the import notifications, sender and recipient of the property alert notifications (PLUS) and recipient of the cancellation form. The address also serves as the fallback recipient for property enquiries: these go to the contact person who was imported with the property from your real estate software, and only if no email address is stored there do they go to the general contact. You can then change each of these entries individually in the settings, for example in the contact form settings.
Link legal pages
Section titled “Link legal pages”For enquiries from consumers you need a privacy policy and, as a rule, a cancellation policy. WP-ImmoMakler shows checkboxes in the contact form that link to these pages. In this step you select the matching pages of your website:
- Privacy policy — if WordPress already has a privacy page set (Settings → Privacy), WP-ImmoMakler uses it; the step shows it and links to the WordPress setting. Otherwise, select a page here — your selection is also saved as the privacy page in the WordPress settings.
- Cancellation policy
- Terms and conditions — link your terms and conditions page, or choose “I have no terms and conditions”: WP-ImmoMakler then removes the terms and conditions checkbox from the contact form. If you select a page later, the checkbox appears again.
The step counts as done as soon as the privacy policy and the cancellation policy are linked and the terms question is decided — by a linked page or by choosing “I have no terms and conditions”.
In the contact form settings you can additionally store PDF files instead of pages and adapt the texts of the checkboxes.
Logo for PDF exposés
Section titled “Logo for PDF exposés”PLUS This step is available in the PLUS editions.
WP-ImmoMakler creates a PDF exposé for every property. Upload your logo from the media library here — it appears in the header of every PDF page. SVG, PNG and JPG files are suitable. You can adjust the size and alignment of the header in the backend of your website (wp-admin) under WP-ImmoMakler → Settings → PDF print view.
If your theme already has a logo (Customizer logo), the selection is preset with it — save to adopt it, or choose a different logo. The step counts as done as soon as a logo has been saved.
Set up Google Maps
Section titled “Set up Google Maps”If your maps are drawn with Google Maps, WP-ImmoMakler needs two Google Maps API keys: a browser key for displaying the map and a server key for geocoding. You can create both for free in the Google Cloud Console — the step-by-step guide walks you through the setup.
Alternatively, enable the checkbox “Continue without API key” to use the simple Google Maps embed without a key.
Which service draws your maps in the first place is chosen in the Customizer under WP-ImmoMakler → Maps, in the Map provider setting — MapLibre works without an account and without a key. More on this under Maps and Geo services.
Set up the property transfer
Section titled “Set up the property transfer”You usually maintain your properties in your CRM software or portal — WP-ImmoMakler takes them over from there automatically, via an OpenImmo transfer or a direct interface, for example onOffice, Propstack or ImmobilienScout24. Alternatively, you can also create properties directly in WordPress. This final step links the matching guide: how to set up the transfer for your software is shown in the CRM software overview.
You can see the status of the transfers in the backend of your website (wp-admin) under WP-ImmoMakler → Property Importer. The step counts as done as soon as properties exist on your website.